Showing posts with label rigglettes. Show all posts

Wednesday, October 28, 2015

Penny Pouch - Easy DIY

This is a little pattern that I've been playing around with for awhile. I think I finally have all the kinks worked out of it so, I thought I'd share it with you. It's a little zippered purse that's the right size for credit cards or drivers license and some cash. It has a keyring attached to one end and the whole thing will fit nicely in your pocket. It's great if you just want to grab your essentials for a quick run to the grocery store or any place that you'd rather be hands free!


I started out making them out of fabric scraps - which works fine but you'd really need to line it and then you have to deal with two extra layers of fabric which reduces the overall size and changes how the zipper is put in.

What I ended up using is Marine Vinyl - yup, the stuff they use to make boat seats. Waterproof (of course!), sturdy as all, easy to sew, self lined, doesn't fray or stretch, colorfast - what more can you ask for?

Here's how it goes...


You need one 4" x 5" rectangle, two strips that are 2" x 5", two strips that are 3/4" x 4" and a zipper that should be at least 6" long - you'll be trimming it to fit later.

Put the zipper in first by taking one of the 2" x 5" strips, placing the edge of the fabric very close to the zipper teeth and sew a close (1/8") seam. Leave at least an inch of zipper hanging off both ends of the strip, you'll trim this later
.

Sew the second 2" x 5" strip to the zipper in the same manner. Now you have to create a zipper stop at each end. Do this by simply using a zigzag stitch at each end. Make sure to open the zipper before closing both ends - you want the zipper tab to be within the body of the zipper.


                                                    Once you've zigzagged over the ends of the
zipper you can clip the remaining pieces of the zipper even with the fabric. This is the face of the bag - so simple!

Now to make the keyring tab. Sandwich the two 3/4" x 4" strips wrong sides together and stitch all the way around as close as possible to the edges.


Now you're ready to assemble the purse. Slide the keyring onto the tab, fold the tab in half and place the ends centered over the zipper at the edge of the fabric. Stitch the tab in place. (Pretend like this photo is actually in focus!)


Now sandwich the bottom and top pieces right sides together. Remember to leave the zipper at least halfway open so you can turn the purse right side out after stitching, and make sure to keep the keyring out of the way as you stitch the two sections together. Use a 1/4" seam allowance. When you're finished, clip the corners, open the zipper as far as you can and turn the purse right side out.


A chopstick or knitting needle work well to push the corners out. And - you're done! How easy was that? These make great little stocking stuffers, hostess gifts, teacher appreciation and on and on! You could make these longer or place the zipper higher or going in the opposite direction. It's a really easy, very versatile item that has hundreds of uses and is easy to alter to suit your needs.


Try making a few - send me pictures of what you come up with! We'd love to share your ideas here on the blog!


Saturday, October 10, 2015

To Amazon or Not to Amazon


I'm just gonna start this by telling you that I have been an Amazon seller since 1994 - over 20 years. I think it's safe to say that makes me an expert on selling through the Amazon platform.

This is the story of my experience with Amazon.

 I owned a used bookstore for over 25 years. After a few years of struggling along what I noticed was that if I was going to be able to make a living from my store, I was going to have to figure out how to reach more customers - brilliant, right? As I was researching how to get into the mail order side of my business I came across Amazon. They were launching a new division. They were going to allow used book dealers to post their merchandise on the Amazon website. My husband thought I should try it putting my books on the site. As scary as it was I made the decision to try it, if it didn't work out in a couple of months I would pull out and try something else.

It was a bit complicated to get started, there were many emails with instructions and such, I was by no means a computer expert but with my husbands help, muddled along, got our database together, figured out FTP and uploaded it one afternoon. Then, we waited... what happened was completely unexpected and overwhelming. Within minutes we started to get orders. Lots of orders.... so many orders that before the end of the first day, we had to put our store -  'on vacation' so that we could process the orders that had come in and order shipping supplies!

Yes, it was expensive - we paid $39.99 per month for the site plus 15% of sales. For a little bitty bookstore just starting out that was a pretty big hit to the budget. But the old adage, "it takes money to make money," is absolutely true. Selling on Amazon more than tripled our business immediately. In less than 10 years it helped make our store the largest used bookstore in the Shenandoah Valley of Virginia. We grew to more than 3000 square feet with over 50,000 books on the sales floor. We were selling over 6000 books every month, making over $250,000 a year in sales! The biggest problem we had was keeping up with demand. The important thing to understand is that  this never would have happened without Amazon.


Fast forward to today. I sold the store three years ago and moved out of state.  I've been a jewelry artist for over ten years and I wanted to focus on growing that business. It's a struggle - I'm the entire business, manufacturing, marketing, sales, shipping, bookkeeping, social media department etc...  For anyone running a business you know that it can be an all consuming venture. It's not a reliable income, it can be very much feast or famine. So, like any business you realize that if you're going to sell enough to make a living you have to reach more people. In the art business that generally means doing shows - Argh! what a pain!! A two day show means a minimum of four days work and a lot of expenses. Displays, packing, travel, hotels, meals, set up and sitting on site for usually two long days hawking your wares. There are no guarantees that it's going to pay off. I can tell you horror stories all day long about friends who shelled out hundreds of dollars in fees to sit at a show for two days and came away not even covering the expenses!

Or, you try to find galleries or shops to take your work wholesale or on consignment. Most of the time this situation is expensive - average consignment commissions are 70% artist - 30% gallery. Wholesale is worse, most retailers want to give you 60% of your asking price to purchase your work. So we all became Etsy sellers because we could work from our studios, reach thousands of customers, the fees weren't as bad as the galleries or nearly as much work as shows... great, right?

It worked pretty well for awhile - but before we knew what was happening Etsy began to implode. Pretty soon the people who were visiting your site weren't buyers... they were other sellers looking for better ideas to boost their own lagging sales. Then Etsy made some business decisions that may have worked out well for them, but not so great for the rest of us - and once again, the handcrafters began looking for a new platform.

What you'll find is that it's pretty slim pickins' if you want to sell on someone else's platform. Sure, there are lots of them but they don't come close to the powerhouse of Amazon. Here's how it breaks down according to an article in PC World: Etsy is the largest platform with 875,000 registered merchants, a number that is steadily dropping. Finding out how much the average seller is making is much more difficult but if you read the forums on Etsy it's a pretty sad state of affairs. Hundreds of merchants are listing but a very small percentage of them are doing more than covering the cost of their supplies and many of them don't even make that.

If you combine the total of the next four biggest platforms, Bonanza, DaWanda, Zibbet and iCraft you'll only have a total of 173,000 registered merchants with pretty much the same results that the merchants on Etsy are having. If you're a US seller, only Bonanza is based in the US and selling through European platforms creates it's own headaches. Nevermind you say, you'll go it alone - set up your own website and learn SEO, RSS and all the rest of the techno alphabet soup!


Everyone has a website, Facebook, Twitter, a blog, Instagram - you work really hard to make these platforms look professional - it's hard, we're not computer wizards - we're artists! But we struggle along trying to understand all the technobabble because, who can afford to pay $500 to an expert to develop and maintain a website? Does this help? Are you making a living from your craft? Probably not, according to the Bureau of Labor Statistics the average income for a crafter is less than $30,000 a year. I don't know anyplace where you can get by on that kind of income.

So, let's talk about Amazon - yes, Amazon has fees - so does every other platform out there. if you fairly compare features Amazon is not the most expensive. The professional level on Shopify is $79.00 per month plus fees and they have no where near the branded power of Amazon. I had a Shopify site for several months - made a total of two sales - dismal.

 Everyone shops on Amazon - it's easy, convenient, secure, fast and has everything - it's right in your living room. You have to understand and appreciate the value of what you are paying for - think of all the time and money you spend trying to get your work in front of people who are willing to pay you for it. Did any other crafters or artisans garner a prime time story on a national news channel (CNN) when their website launched? Amazon already has all the technical know-how, security, infrastructure, and marketing skills; but best of all, Amazon already has your customers, millions of them! That's what great about Amazon - they are marketing geniuses and they have more money than you're ever gonna have for promotion. If you could double or triple your business wouldn't that be worth $39.99 a month?

But what about that small print you say? Yup, Amazon has lawyers - they write up those agreements to protect Amazon. So does Etsy and Ebay and every other platform out there. But seriously, if you believe that Amazon wants to steal your products and sell them for themselves you're delusional and should definitely look into other options. Amazon already has a great business model, they allow other people to sell their merchandise through the Amazon website - they've been doing it for over 20 years. It works for both parties - and you know what they say..."if it ain't broke, don't fix it."


You have to make up your mind - are you trying to make your art your business or, is this a hobby or a part time venture? If you're trying to make a living then you have to think like a business owner and use the left side of your brain instead of your heart to make decisions concerning your business. If you  just love to craft and don't want to be buried in your projects then stick to the church bazaar and yard sale circuit.

Friday, October 2, 2015

Yea, I Fixed That!

I almost never buy jewelry, why should I? I usually just make my own. But once in awhile I see something that catches my eye. We were on vacation earlier this year and my daughter and I were shopping one afternoon. We found these nifty little bracelets called 'Gingersnaps' - they have a little piece in them that you can 'snap' different charms into. Aww, now who doesn't want a sparkly turtle? So, I bought one, made a nice, inexpensive souvenir from our trip.


I wore it one day while we were still on vacation, then packed it up and brought it home. When I opened my travel case - it was broken. Dang it! I hate when that happens. But, serves me right for buying 'cheap'. So I fiddled around with it a little bit, decided that I could probably glue it and it might hold up for awhile. OR - I could make something else out of it, something better, something sparkly and unique!


So, I took the whole thing apart, kept what I thought might be useful for other projects - waste not want not! I dug around in my stash of beads and such until I came up with a color scheme and some beads that I thought worked well together. I ended up with this...


A little more my style... I love the colors and I prefer toggle clasps to the lobster claw that was on the original piece. I also really like that it looks like a watch but it isn't. Win - Win situation for me, I still have a souvenir from my vacation, I can still get more of the little snap on charms if I want something different which is a pretty cool feature and I ended up with a one-of-a-kind piece that I love!


Moral of the story, don't throw away old or broken jewelry. The components can usually be worked into something new that you can continue to love and wear!

Thursday, September 17, 2015

Bears and Bears and Whale Tails? Oh My!

Something I've learned about myself is that every once in awhile it's important for me to kick start my creativity. If I work too long at one particular type of craft I find myself losing steam and it becomes harder and harder for me to come up with something that feels fresh. As soon as that happens I know I need to be poked in that part of my brain that comes up with new ideas.

Kickstarting isn't always complicated, sometimes it's as simple as buying a magazine and taking a look at what new products or trends are coming down the pike. Seeing another artists methods can trigger an idea, attending trade shows is an almost overwhelming stimulus to new ideas, but one of my favorite kickstarts is always classes or workshops.


A couple of weeks ago I went to Pennsylvania to visit Jean Van Brederode in her studio - Charmed I'm Sure. Jean was running a workshop on kiln enameling with liquid and powdered enamels. The finished project was this bracelet of polar bears. Once I saw the picture, I knew that I'd found my kickstarter!


Jean is the perfect person for visiting if you need a little inspiration boost. Her studio is jammed with the coolest tools, supplies and finished projects - you don't even need to do anything but sit there, you can't help but be motivated to create something. And Jean is a generous and patient instructor.

So, we watched a short video presentation about the project we would be working on, Jean gave everyone a printed instruction sheet, tool kit and all the supplies we needed for the bear project.


 We spent the next six hours learning about hydraulic presses, pancake dyes, kilns, enameling with liquids and powders and a host of other things related and not related to the project we were working on!


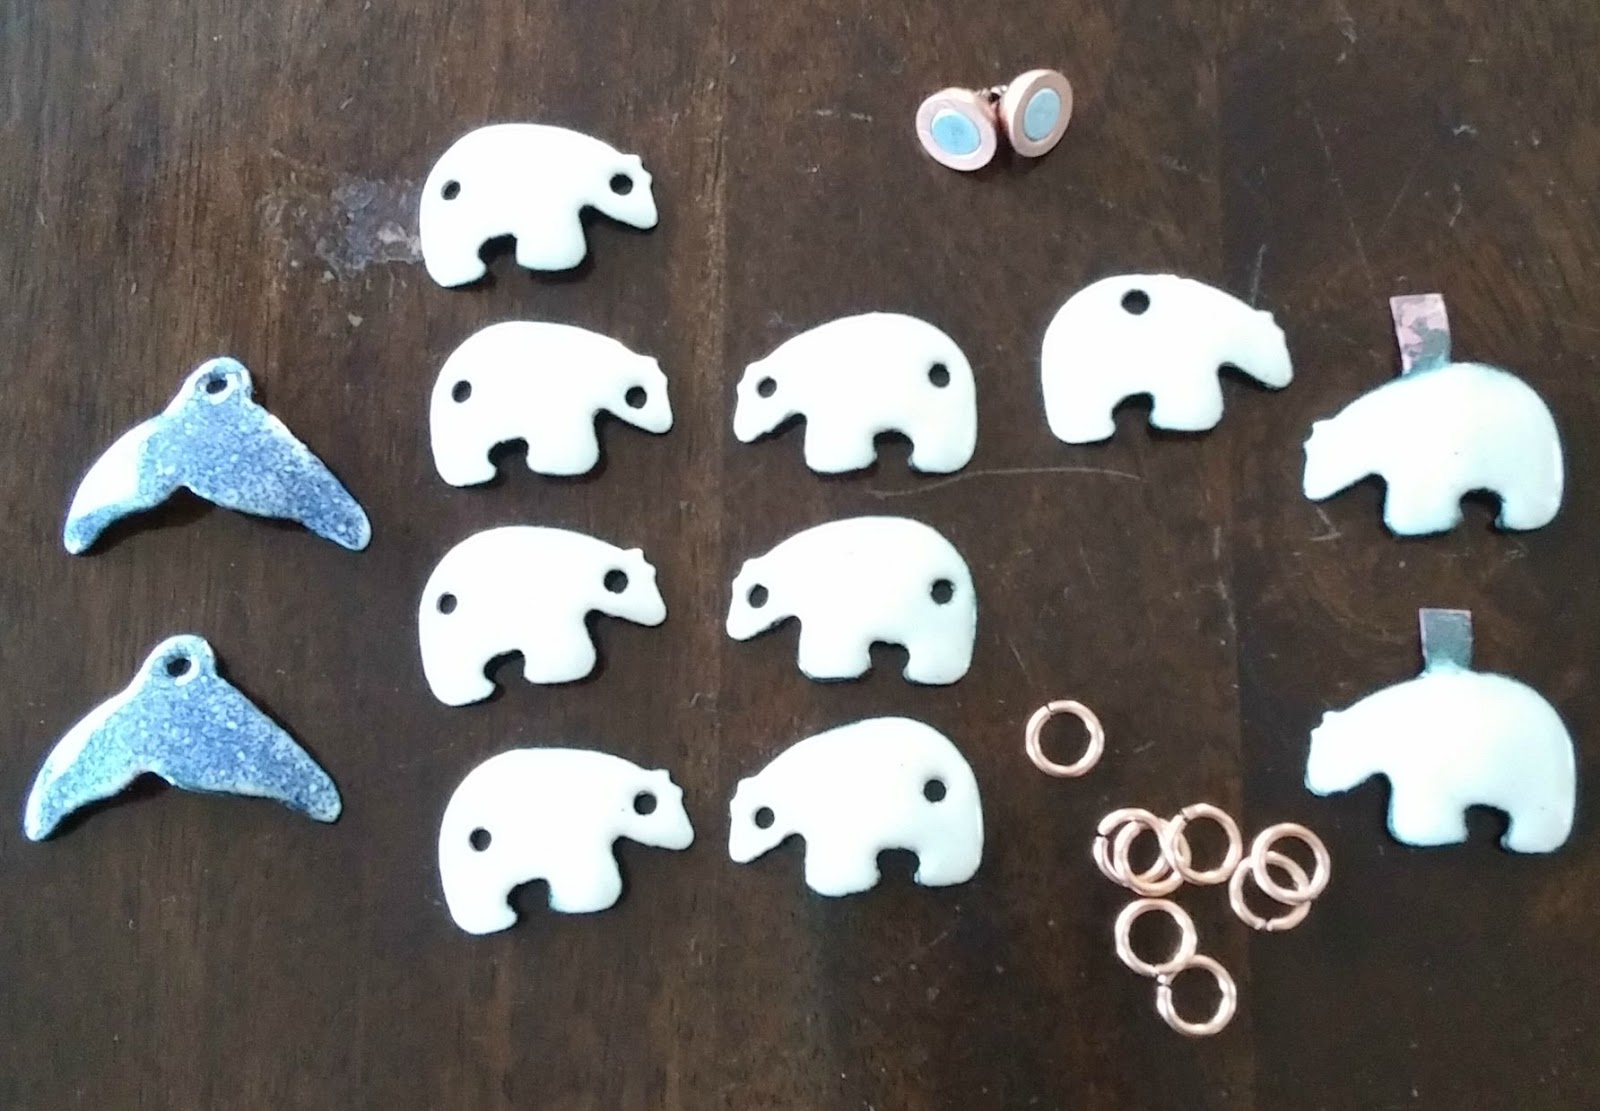
The process of creating the little bears was enough to get me percolating with ideas on what to make. I  knew that I wouldn't be happy making just one piece so I made sure to put holes in the sides and tops as well as making bears that faced in both directions. I also made a couple of bears with a tab on top thinking that they would make really cute necklaces. While I was at it, I made two whale tails just because Jean said I could!


At the end of the day I had a little pile that looked like this:


I gleefully drove home with  my little stash envisioning all the adorable things, rustic things, sparkly things that could be made with these delightful little copper bears!

The first thing I made was this bracelet - I love that it feels chilly with the cold and snow but sparkly at the same time - like the sun on snow. Glass is almost always my medium of preference so of course I had to have some white and clear lampwork beads in there and silver is the perfect shiny accent.

After that there was no stopping! I made several more pieces...


Two more bracelets and the necklace using one of the tabbed bears. AND.... I haven't even used the whales yet!

This was the perfect day for me - I seriously kick started my creative brain process, I learned something new, had a great day with a fun bunch of other creative people and made new friends - oh, and for a bonus, had a delicious lunch!

So the next time you're sitting in your studio pondering your pile of stash and drawing a blank - check out the internet - there are classes and workshops everywhere! If you live near Mechanicsburg, PA - go see Jean - she'll inspire you!

Saturday, July 20, 2013

Hoard Blog 2013!


I hoard, therefore I am

I hang on to stuff, pile it up, stack it, sort it, push it around, play with it and just plain keep it --- is this bad? NO! No I say! It's necessary. One day, I'm going to be making a necklace with the very fun but oddly shaped little bead cups that I got and I'm going to remember that a year ago, on a whim I bought these funny little glass bead caps .... and yes, they are going to be the perfect marriage and I'll end up with this really adorable little necklace.


 If I didn't hoard things then when I sit down to start something that is just a little tickle in the back of my brain, not exactly clear, not quite focused, just that fuzzy sort of feeling, a color combination that I think might work or shapes... how am I going to make it coalesce into something clearly amazing if I don't have a hoard of stuff to poke at, seeking the perfect shape, color, size?


 What am I supposed to do??? Try to purchase only the components I need to make a single piece? How crazy is that? Bah! It's impossible. So, yes, I hoard. Personally I like the term 'stock pile' better - sounds more productive, less loony.

But for this Blog Hop - I decided that I would try to use some of my stock pile and at the same time do something fun and creative with all of it. For those of you familiar with my work, you know that color is my thing... I like lots of it and I like unusual combinations of it.

 The challenge to myself was ONE color for each piece. That way I would be able to clean out a little bit from a lot of my stock pile, but I would still end up with a beautiful rainbow of work.


I was a little nervous because I'm not normally a monochromatic type of gal... but once I got rolling with it I was having a ball! It was much easier then I expected and I had such a good time playing with the shapes and color variations that I got to wondering why I hadn't thought of this sooner!!!


 I tried out different shapes and styles of hooks --
            I didn't worry too much if the shade or hue weren't the same --
                       I kept the metals to colored copper so I didn't detract from the single color --
                                    Each unique but the same but not the same at all!

I had so much fun with the color challenge - that I decided to try something a little different. I tried to use as many beads as I could from one artist. Lately I've been buying up lamp work by Tanya MGuire like a crazy woman. I have a serious pile of it! She makes these really amusing odd little shapes in really fabulous colors.


I wasn't able to use as many of Tanya's beads as I could have.... I'm not quite ready to release them to the world just yet but I did manage to make these two necklaces which I'm really happy with. Maybe in a few weeks I'll be able to use more of them... but for now they will have to remain in my stock pile.... my precious.... heee heeeee hee heeee!!

PS - Check out all the amazing work of the other hoarders....

1.  Lori Anderson, Pretty Things  Our lovely hostess :-D
2. Nancy Dale, NEDBeads
3. Roxanne Mendoza, Roxi Designs
4.  Melissa Trudinger, beadrecipes
5.  Rana Lea, Rana Lea Designs
6.  Leah Tees, My Beady Little Eyes
7.  Rita Avila, Jewel School Friends
8.  Linda Anderson, From the Bead Board
9.  Sharon Palac, Sharon’s Jewelry Garden
10.  Erin Guest, Renlish
11.  Joan Williams, lilruby jewelry
12. Diane Hawkey, Diane Hawkey
13.  Jo-Ann Woolverton, It’s a Beadiful Creation
14.  Sue Kennedy, SueBeads
15.  Lisa Cone, Inspired Adornments
16.  Kari Asbury, Hippie Chick Design
17.  Nichole Byers, Nichole Byers
18.  Lori Jean Poppe, Adventures in Creativity
19.  Linda Landig, Linda’s Bead Blog and Meanderings
20.  Lori Schneider, Bead Addict
21.  Molly Alexander, Beautifully Broken Me
22. Cece Cormier, The Beading Yogini
23.  Niki Sayers, Silver Nik Nats
24.  Elsie Deliz-Fonseca, Eliz-Eliz and All That Craft
25.  Amber Dawn, Inventive Soul
26.  Heather Powers, Humblebeads
27.  Sarah Goode, Pookledo
28.  Monique Urquhart, A Half-Baked Notion
29.  JJ Jacobs, Coming Abstractions
30.  Cheri Reed, Creative Designs by Cheri
31.  Robyn, Museiddity
32.  Catherine King, Catherine’s Musings
33.  Jacquie, Bead Gypsy
34.  Janet McDonald, Singing Woods
35. Kay Thomerson, Kayz Kreations
36.  Tanty Sri Hartanti, TJewellicious by Tanti
37.  Hannah Rosner, Good River Valley
38.  Rochelle Brisson, A Creative Chelle
39.  Nelly May, Smelly Nelly
40.  Skylar Bre’z, Brising Beads
41.  Beti Horvath, Stringing Fool
42.  Christie Murrow, Charis Designs
43.  Leanne Loftus, First Impression Design
44.  Valerie Norton, Hot Art
45.  Judy Riggs, Rigglettes
46.  Crystal Thain, Here Bead Dragons
47.  Terry Carter,  Tapping Flamingo
48.  Sue, Mid-Life Great Expectations
49.  Nan Smith, Wired Nan
50.  Miranda Ackerley, MirandAck Arts
51.  Marie Covert, Creating Interest
52.  D’Arsie Manzella, This Here Now, Mamacita
53.  Stephanie Haussler, Pixybug Designs
54.  Lori Bergmann, Lori Bergmann Design
55.  Johanna Nunez, The Lovely One Design
56.  Mary Govaars, MLH Jewelry Designs
57.  Becky Pancake, Becky Pancake Bead Designs
58.  Alicia Marinache, All the Pretty Things
59.  Debbie Rasmussen, A Little of This, A Little of That
60.  Nat, Grubbi Ceramics
61.  Marjorie Savill Linthwaite, Bennu Bird Rising
62.  Cheryl McCloud, One Thing Leads to Another
63.  Heather Otto, The Crafthopper
64.  Candida Castleberry, Spun Sugar Beadworks
65.  Tracie Dean, Dean Designs
66.  JuLee Wolfe, The Polymer Penguin
67.  Ginger Bishop, Lil Mummy Likes
68.  Karen Mitchell, Over the Moon Design
69.  Jeannie K Dukic, Jeannie’s Blog  You’re Here
70.  Dini Bruinsma, Angaza by Changes
71.  Birgitta Lejonklou, Create With Spirit
72.  Shalini Austin, Jewellery by Shalini
73.  Jayne Capps, Mama’s Got to Doodle
74.  Ile Ruzza, Ilenia’s Unique Beaded Jewelry
75.  Jackie Marchant, Fiddledeedee Jewelry
76.  Annita Wilson, AW Jewelry 
77.  Sherri Stokey, Knot Just Macrame
78.  Hannah Trost, PZ Designs
79.  Linda Inhelder, Must Haves Jewelry
80.  Miri Agassi, Beadwork
81.  Hope Smitherman, Crafty Hope
82.  Dyanne Cantrell, Dee-Liteful Jewelry Creations
83.  Susan Bowie, Susan Nelson Bowie
84.  Megan Milliken, MaeMaeMills
85.  Menka Gupta, Menka’s Jewelry
86.  Ambra Gostoli, Chic and Frog
87.  Lori Lochner, Bloghner
88.  Gerda Jurimae, Gerda’s Crafts Blog
89.  Susan, Mistheword
90.  MaryLou Holvenstot, MaryLou’s time2cre8
91.  Mary Shannon Hicks, falling into the sky
92.  Karin King, The Sparklie Things Blog
93.  Christa Murphy, Adventures of One Beady Woman
94.  Jenny Davie-Reazor, Jenny Davies-Reazor
95.  Donetta Farrington, Simply Gorgeous
96.  Mallory Hoffman, Rosebud 101 – For the Love of Beads
97.  Danielle Kelley, Imbue the Muse
98.  Kym Hunter, Kym Hunter Designs
99.  Dolores Rami, CraftyD’s Creations
100.  Marcia Dunne, 13 Alternatives
101.  Marlene Cupo, Amazing Designs
102.  Emma Todd, A Polymer Penchant
103.  Wendy Holder, Jewelry by WendyLea
104.  Michelle Escano, The Cabby Crafter
105.  Louise Glazier, Lily and Jasmine Treasures
106.  Dana Hickey, Wind Dancer Studios
107.  Lennis Carter, windbent
108.  Anne Betenson, Crystal River Beads
109.  Audrey Belanger,  Dreams of an Absolution
110.  Lisa Stukel, Carefree Jewelry by Lisa
111.  Janine Lucas, Travel Stories
112.  Claire Lockwood, Something to Do With Your Hands
113.  Kathy Engstrom, Catherine’s Dreams
114.  Paula Hisel, Simply Beadiful
115.  Karla Morgan, Texas Pepper Jams
116.  Mischelle Fanucchi, Micheladas Musings
117.  Kim, Cianci Blue
118.  Linda Sadler, Ida Louise Jewelry
119.  Karen, Spokalulu
120.  Jennifer LaVite, Dry Gulch Bead and Jewelry
121.  Andrea Glick-Zenith, ZenithJade Creations
122.  Karen Martinez, Fairies Market
123.  Robin Reed, Artistry HCBD
124.  Amy Bright, LABweorc
125.  Jasvanti Patel, Jewels by Jasvanti
126.  Tammie Everly, TTE Designs
127.  Karin Slaton, Backstory Beads
128.  Natalie Moten, Running Out of Thread
129.  Sharyl McMillian-Nelson, Sharyl’s Jewelry & Reflections
130.  Jenny Kyrlach, Wonder and Whimsy
131.  LiliKrist, Handmade by LilK
132.  Jessica Klaaren, The Truth Space
133.  Cynthia Abner, Created Treasures
134.  Beth Emery, Stories by Indigo Heart
135.  Heather Davis, Blissful Garden Beads
136.  Jeanne, Gems by Jeanne Marie
137.  Sandi Volpe, Sandi Volpe
138.  Laren Dee Barton, Laren Dee Designs
139.  Steph, Confessions of a Bead Hoarder
140.  Carolyn Lawson, Carolyn’s Creations
141.  B. R. Kuhlman, Mixed Mayhem
142.  Patty Miller, Cabari Beads
143.  Elizabeth Bunn, Elizabeth Beads
144.  Marianna Boylan, Pretty Shiny Things
145.  Lizzie Clarke, The Need to Bead
146.  Christina Miles, Wings ‘n’ Scales
147.  Patricia, The Color of Dreams
148.  Marde Lowe, Fancimar
149.  Ev Shelby, Raindrop Creations
150.  Sarah Small, By Salla
151.  Perri Jackson, Shaktipaj Designs
152.  Laurie Vyselaar, Lefthand Jewelry
153.  Pam Traub, Klassy Joolz
154.  Lisa Harrison, Daisy Meadow Studio
155.  Anzia Parks, Anzi-Panzi’s Work Shoppe
156.  Ingrid, Lilisgems Handcrafted Jewelry Inspirations
157.  Andra Weber, Andra’s Joyful Journey
158.  Kelly Hosford Patterson, The Traveling Side Show
159.  Adlinah Kamsir, Dreamstruck Designs
160.  Marci, That Nothing Be Wasted


Saturday, March 30, 2013

Bead Soup 7

     After weeks of planning, playing, preparing and photo-ing I'm finally done with the soup I received from Linda Djokic. She sent me a serious ton of stuff - all of it lovely. So, let's get to it - here's a picture of the entire ensemble of pieces I've made (so far!).
The first in the series was made using Linda's 15mm lampworks. I love these beads, they have the feeling of an impressionist painting. Subtle speckles of pastels in pink, blue, purple and green. They feel like Spring. I added wind dings from Genea Beads in rosy-raspberry colors, the silver accents and the clasp.

  I'm really happy with the results. The piece just about put itself together, everything just 'clicked' as I layed it out on the play table.

     The next piece I did was the necklace using Linda's large polka-dot lampwork heart. I wanted this to be something really whimsical and fun but I didn't want to simply use the heart as a dangle on a chain. What I came up with was to use the heart as a component of the clasp and offset it to the side. I think it draws the eye to it because of the placement and its size compared to the other beads.

 The two spacers that go with the heart made a perfect set with the large cast resin squares and I love the turquoise as an accent to the red. I used small ceramic donuts to make the lower part of the chain and a length of squares & circles to make the back - I like the balance of squares and circles on the entire piece.

     A lot of the colors in Linda's work are pale, delicate, misty... I tend to lean more toward the bolder more intense colors. But I think the pink bracelet is a nice balance. From my stash I added the pink spotted lampworks, the silver accents, the pink and white pearls, sea glass, glass rings and the toggle. An awesome mash-up of pinkiness!
     I moved on to the large purple lampworked flowers. These presented the biggest challenge for me, for some reason they  just wanted to dangle and I kept seeing them facing up, harumph!!  After much argument and wire and starting over, I admitted defeat and made two necklaces.


 Most of the beads in both pieces were from Linda's soup, I added the chains for both and small accents. Everyone that has seen them so far as loved the purple flowers. After I finished I thought, "I must have used everything by now!" - but, NO... I checked the box and there were still many, many beads. The final piece I made used the fresh water pearls and the pressed glass purple beads. I added some lampwork and toggle and filled in with lots of little bits from my stash. You'll recognize the rubber O's I love that I get from MyElements I use them in almost all my play! This piece is very much my style - everything but the kitchen sink and lots of color!

Whew! I still have a few beads left from the overly generous soup that I got but I simply ran out of time trying to use everything. As I finish with the rest, I'll do updated posts so you can all see them. I'm off to check out everyone else's soups - Cheers!!


Pin It button on image hover