And so it begins!
I got my Bead Soup partner - I couldn't be more excited! I'm paired up with Johana Nunez. She's from Aibonito, Puerto Rico. It's exciting to be paired with someone who's from a place so far from where I live, it's one of my favorite things about Bead Soup, the world shrinks! It's great to make new friends and learn about other artists passions.
Johana works with enamels - she's a student of Barbra Lewis so you know her work is amazing!
This is one of the pieces from her Etsy site. There are some great little birds that I just loved. She also does lots of enameled beads in really bright colors.
I took a workshop in enameling with Jean van Brederode so I have an understanding of the process, but I definitely don't have the skills for making my own pieces.
Its another great thing about Bead Soup - getting the chance to work with something you've never tried but would love to know more about.
The next step is to send Johana some soup to work with. I use a lot of lampwork, very bright intense colors and unusual bits-n-pieces. One of my favorite resources for supplies is MyElements - Yvonne always has the most smile-inducing stuff!
I've been scrounging through my piles of stuff trying to decide what to send. It's a bit of a process - I want to send something inspiring, colorful, different and out-of-the-ordinary. I also want to send things from my favorite artists and craftspeople. Finally got it together and packaged up so that as soon as I was partnered I was able to drop it in the mail.
It looks like this....
Ha! You didn't actually think I was going to let you see it before Johana did you??? It went in the mail this morning and as soon as she's had the first look, I'll put the picture in focus for the rest of you!
I hope everyone else is having half as much fun as I am with this whole process -- Thanks to the intrepid Lori Anderson for making this all happen!!
Cheers!
Monday, March 3, 2014
Friday, February 28, 2014
Gathering Ingredients for a Soup
For once in my life I'm not behind schedule!! High five ME!!
I have once again joined the ranks of the creative crazies for Lori Anderson's Bead Soup event. This is my third soup and every year it gets to be more interesting.
For those of you living in a cave out-of-touch - the Bead Soup Blog Party is an event that Lori sponsors every year. Hundreds of crazy jewelry artists are paired up, exchange sets of beads and make whatever they are inspired to make. You can see my soup from last year here: Bead Soup 7
Usually I'm one of the people who doesn't manage to get the bead soup in the mail until very close to the deadline. It's hard for me to decide which beads to send. This year, I looked in the stash and the beads practically put themselves in the shipping box!
So, to keep myself from changing my mind before Lori emails the names, I packed the whole pile up and they are snug in a box and ready to roll!
Now, I just have to hope that whoever I'm partnered with will send something that inspires me just as quickly to complete my project!
I'll be posting pictures of what I sent and what I receive as we move along so keep an eye out for more bead soup news!
I have once again joined the ranks of the creative crazies for Lori Anderson's Bead Soup event. This is my third soup and every year it gets to be more interesting.
For those of you living in a cave out-of-touch - the Bead Soup Blog Party is an event that Lori sponsors every year. Hundreds of crazy jewelry artists are paired up, exchange sets of beads and make whatever they are inspired to make. You can see my soup from last year here: Bead Soup 7
Usually I'm one of the people who doesn't manage to get the bead soup in the mail until very close to the deadline. It's hard for me to decide which beads to send. This year, I looked in the stash and the beads practically put themselves in the shipping box!
So, to keep myself from changing my mind before Lori emails the names, I packed the whole pile up and they are snug in a box and ready to roll!
I'll be posting pictures of what I sent and what I receive as we move along so keep an eye out for more bead soup news!
Tuesday, February 18, 2014
A Little Creativity Change-UP
Sometimes even though I feel the need to create something.... I sit down at the bench and
N-O-T-H-I-N-G occurs to me. I don't see a bead, or a color, or a shape or a toggle that starts the bubble of creativeness rising up. Just the gray fluffiness of nothing... *sigh*
Very frustrating.
This usually happens to me in the winter. This year has been especially bad - we've had mountains of snow. It seems endless and since I'm one of those people that is driven by color it's hard to get inspired when everything is freaking white.
Time for a change - when this happens to me I head to the fabric store. I love to sew and I love fabric - the patterns, the colors, the textures - so many choices! Even if I didn't sew, I would still go to fabric stores - it's a world of eye candy, there are color combinations you will have never thought of and so much ....
Sometimes just the colors are enough, fabric designers must be the most creative people on the planet.
What a fun job it must be to just sit down and play with color and shapes and textures all day.
I love the creative freedom of fabric.
I love the way fabric makes me see things differently.
That can be just the little push your creativity needs to go in a new direction.
Crazy FUN!!
Other times I'll see something made by someone else....
.... and that will inspire me to do something completely different - something I haven't tried...
Lately, I've been making these crazy fun tote bags - I love the color combinations, the surprise of different lining fabric, but such a practical item! Who doesn't need a tote bag filled with pockets?
So, as soon as the roads are clear.... Get in your car.....
Inspiration awaits.....
N-O-T-H-I-N-G occurs to me. I don't see a bead, or a color, or a shape or a toggle that starts the bubble of creativeness rising up. Just the gray fluffiness of nothing... *sigh*
This usually happens to me in the winter. This year has been especially bad - we've had mountains of snow. It seems endless and since I'm one of those people that is driven by color it's hard to get inspired when everything is freaking white.
Time for a change - when this happens to me I head to the fabric store. I love to sew and I love fabric - the patterns, the colors, the textures - so many choices! Even if I didn't sew, I would still go to fabric stores - it's a world of eye candy, there are color combinations you will have never thought of and so much ....
Sometimes just the colors are enough, fabric designers must be the most creative people on the planet.
What a fun job it must be to just sit down and play with color and shapes and textures all day.
I love the creative freedom of fabric.
I love the way fabric makes me see things differently.
That can be just the little push your creativity needs to go in a new direction.
Crazy FUN!!
Other times I'll see something made by someone else....
.... and that will inspire me to do something completely different - something I haven't tried...
Lately, I've been making these crazy fun tote bags - I love the color combinations, the surprise of different lining fabric, but such a practical item! Who doesn't need a tote bag filled with pockets?
So, as soon as the roads are clear.... Get in your car.....
Inspiration awaits.....
What inspires you?
Friday, February 14, 2014
A Weekend With Ann Scherm-Baldwin
So ~ this is what I got for Christmas this year from my DIL
I know - you're jealous - and you should be, it was amazing!
We had a great view to wake up to every morning:
Then we headed to Ann's house to start our lampworking adventure! The garage has been converted into Ann's Laboratory - it's crammed full of glass making STUFF!
Ann is lots of fun - she's a bit of a hoarder, and besides glass she quilts, beads and is a Minecraft junkie. I could have spent days looking at all her collected beads and not have seen all of them. In addition to the garage she also has a craft room that is seriously jam packed with awesome sparkly goodness - my eyes were so full!
It's great to have a teacher all to yourself. Ann's been doing classes for years and has mountains of patience, which in my case is extremely important because I have ADH-Oh Sparkly!! and have a hard time staying focused. I took a lampworking class at the bead show in Philly about a year ago. Even though we had a really great teacher, it's hard to come away with a lot of hardcore knowledge. There was a large group of us, all the equipment was already set up and you're always aware of the time constraints.
The first part of the class is all about the back story to making beads - safety, equipment, glass, setting up a studio - It was fabulous because lampworking can be a bit scary. You work with extremely hot stuff, kilns, flames, molten glass ~ stuff you can seriously hurt yourself using! I felt like I asked a million questions and interrupted Ann's lecture thousands of times, but she never lost patience or scolded - such a sweet lady!
Then we moved on to the fun (but still scary) part - actual bead making! The first thing I learned is that you can't do this right the first time or the tenth time or for a long time. You have to get over the scary part, you have to develop the muscle memory to make beads which only comes with practice, practice, practice!
The top picture is Jamie laying the glass on the mandrel to begin building a bead. You can see the bead taking shape in the bottom image.
No, they aren't perfect!
The ones in the top of the picture are the result of Ann trying to teach a decorating or shaping technique. The beads on the bottom are the ones made the second day when I was mostly just trying to get the hang of making them round, balanced and consistently the same size.
I had such a fun time this whole trip - being at the beach was a nice break from the miserable winter. We had dinner in some great restaurants and relaxed for a couple days while learning about this awesome craft. Now I'll be able to survive the rest of the winter while plotting how to fit a studio in my house!
Saturday, November 9, 2013
Making a Princess Feel the Part!
My niece is getting married next summer to a wonderful guy. They've had a tough couple of months and have complicated lives so the wedding plans keep getting put on hold. But - finally - there is a date set for all the bridal party to get together to go dress and flower shopping. I thought it would be nice to start the day off with a little treat so I made bracelets for the bride-to-be and the merry maids in her wedding colors of pink & navy -
I just wanted something simple, so I went with the classic round ceramic beads. I love the brides sparkly crown toggle and the merry maids smaller crown toggles. The charms are a nod to the location which is on the beach in Maryland.
Wednesday, October 23, 2013
Jumprings - DIY
There is something satisfying about making your own components, whether its the clasp, the beads or the connectors. If you've never tried making your own jumprings you're in for a pleasant surprise - it's not that hard and there are an endless number of ways to get just what you need.
There are a ton of gizmo's out there to make your life easier.
These little mandrel sets are probably the easiest - its pretty self explanatory, wrap the wire around the mandrel, slide it off cut the rings apart. The problem with this is what kind of pliers do you use? You want a really flat cut so the ring will close as seamlessly as possible.
Me - I like BULK - I don't want to have to stop in the middle of a project to wrap and cut jumprings.
So, I went the semi-pro route -
I have a complete cutting system - the Pepe coiler is awesome.
It can make any size jumpring you can dream up simply by inserting the correct size mandrel in the handle and winding right off the wire spool. In a couple of seconds you have a wire coil about 4" long.
The second step is as easy as the first. I have what my son calls the "Uber Dremel" - its a Flex Shaft cutting and grinding tool. The handle has a very thin (.008), VERY sharp blade, you operate with a foot pedal.
The coil goes under the metal plate, tighten the nuts to hold it snug, place the shaft flat on the plate, press the pedal and slide forward at a steady pull. It only takes a couple of seconds to cut the coil into lovely, perfect, flush closing jumprings!
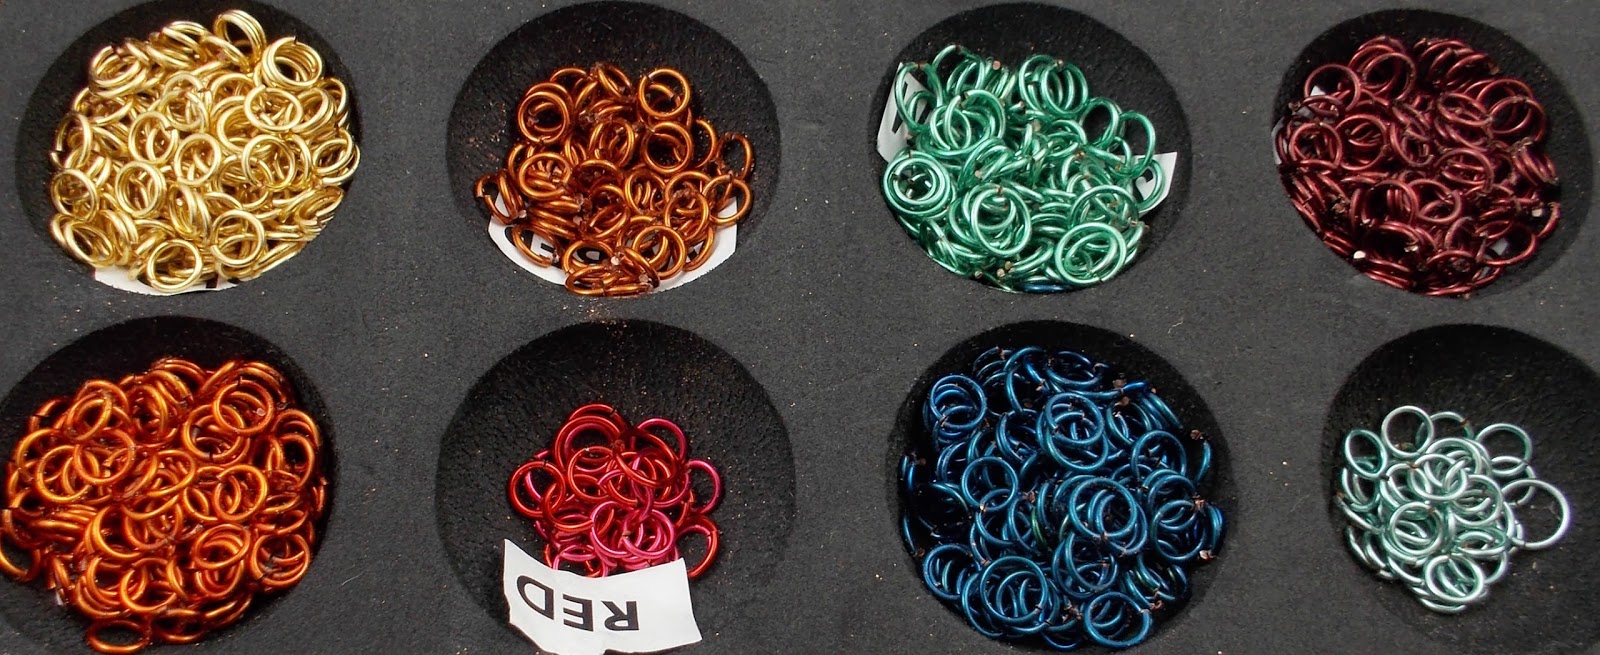
Before you know it, you have a zillion rings in a rainbow of colors!
You can purchase jumprings in a fair number of colors at better bead stores but it's usually near impossible to get a variety of gauges or anything more then two or three sizes. What are you supposed to do when you want to have a hook that's the same color as the jumprings or maybe you need a 20mm jumpring? I love having the option of sizes, shapes and colors.You don't need anything expensive - you can use anything for a mandrel, a pen or a knitting needle are good choices. Get creative! Get exactly what you want - don't settle for what you can find - and as always.... have fun!
Tuesday, October 22, 2013
Retro Remake
My Aunt came to visit in September. She loves antiques, so while she was here I took her to a huge (5 barn sized buildings!!) antique place in Fayetteville, PA. I didn't really expect to find anything - it's not really my decorating style. I thought it would be a nice day for her...
Was I ever wrong?? One of the vendors in the first building had cases and cases of vintage jewelry! It was awesome! I bought several brooches and pins for a bouquet I'm playing around with. I also got a couple of long necklaces that were made out of lucite. You know, that stuff your mom wore in the 50's? The beads were that typical salmon kind of pink that was so popular back then.
Anyway - I stupidly did not take a photo of the necklaces before I cut them apart - sorry!! But I did want to share with you a couple of pieces that I've put together.
A-D-O-R-A-B-L-E!!
This one has the white sparkly lucite rounds and the pink inverted barrel shapes that turned out to be perfect with my favorite component - rubber O's!!
The etched lampwork lozenges came from IMakeBeads on Etsy. The hook is, of course, my creation. I used sterling 18g wire and one of the ribbed turquoise rounds as an accent. I love the fun, light hearted feeling of this piece.
So - get yourself to an antique mall! They're loaded with fun vintage stuff at pretty good prices.
Was I ever wrong?? One of the vendors in the first building had cases and cases of vintage jewelry! It was awesome! I bought several brooches and pins for a bouquet I'm playing around with. I also got a couple of long necklaces that were made out of lucite. You know, that stuff your mom wore in the 50's? The beads were that typical salmon kind of pink that was so popular back then.
Anyway - I stupidly did not take a photo of the necklaces before I cut them apart - sorry!! But I did want to share with you a couple of pieces that I've put together.
A-D-O-R-A-B-L-E!!
This one has the white sparkly lucite rounds and the pink inverted barrel shapes that turned out to be perfect with my favorite component - rubber O's!!
The hook is my own creation using 18g black wire, a bead cap and a bead.
The necklace uses more of the pink barrels, which I think paired perfectly with Donna Millards hand made vintage caps.The ribbed turquoise rounds were a great spacer and the color has that vintage feel.The etched lampwork lozenges came from IMakeBeads on Etsy. The hook is, of course, my creation. I used sterling 18g wire and one of the ribbed turquoise rounds as an accent. I love the fun, light hearted feeling of this piece.
So - get yourself to an antique mall! They're loaded with fun vintage stuff at pretty good prices.
I even managed to find myself an awesome new desk chair!!
Subscribe to:
Posts (Atom)


.jpg)

.jpg)


.jpg)


a.jpg)